You’re home from your research year. You’ve been all over the place, and have thousands of photocopies and scans and lots of great material!
So … uh, now what?
This column is going to be one of those ones where I tell you what I wish I had done, rather than emphasize what I did.
What I did was this: I came home, worked another month at my job, quit, went to Mexico for two weeks to visit in-laws for Christmas, came back and started prepping my first adjunct class at a university nearby (not the one where I was working on my Ph.D.). It was the following summer before I even started working with the material I’d brought home and I’ll be honest: my memory isn’t as good as I had hoped it was.
We all have this fantasy that we’re going to get off the plane from research and immediately start writing our dissertations. Some of us probably set out for research with the expectation that we were going to get a bunch of stuff written while we were doing research.
In my experience, writing while doing research is minimal, and being able to compose those beautiful paragraphs right after research … let’s just say there’s a reason it takes a while.
In other words: if you’re sitting there thinking that you don’t know where to begin, you’re in the majority. Breathe.
Go through everything you collected
Unless you are an absolute superstar and heavily annotated every document you photocopies and scanned (in which case you don’t really need my advice), you probably did so-so on this.
Even if you did a decent job, you probably did what most of us do: your understanding of what you collected is based on which archive you got it from. Now, obviously you don’t want to forget this because it’s important information that you’ll need, but more than that you’ll want to know what everything you collected says.
In order to get excited about writing, you need to both simultaneously go through all of the stuff you collected in order to synthesize it, and gain a bird’s eye view in order to start seeing the linkages in the material. This sounds tedious (I won’t lie, it can be), but it can also get your brain cells firing up and ready to start composing text.
Here’s where you start.
Whether you use post-it notes, an Excel spreadsheet, the notes and keywords function in Zotero, or some other program and system (I would suggest doing it electronically rather than pen and paper as the search function is going to be a key factor in making this useful), start going through and giving your documents a closer read and collecting useful data.
I suggest that at a minimum you’ll want to track:
Names (sender, recipient, subject of the document, any other key personnel you think you might want to search for later)
Dates (the date it was authored at a minimum)
Places
Title (if the document has one)
Subject matter — (this doesn’t have to be super detailed: “Letter from H.C. [High Commissioner] to Interior Ministry re: sale of onions in 1917” is fine.)
Connections (see below)
What I Need (see below)
If you have multi-document PDFs (for example: if you scanned a box or file that all has the same file number and you want to keep them all together), create internal bookmarks for each sub-component so that you can easily locate a document within the larger file. I’ve lost hours scrolling up and down looking for one-page memos lost within a 90 page PDF. You’ll thank yourself for this later.
As you do this, you’ll start to notice trends and connections between documents. This is where you’ll want to go back and add items to your “connections” category — whether it’s “compare to [document reference]” or noting that the other half of the story is contained in a file you found somewhere else, or whatever you need it to do.
I also kept a running note of What I Need–I used this for two purposes. First, I used it to write notes to myself to do a little research in areas that I just didn’t know very much about. If the document referred to an incident or event or person that I didn’t recognize but seemed important, I’d make a note.
I also used it to record articles or books I knew were out there or things I wanted to review (“I know Gallagher discusses this in her book — revisit.”).
The biggest and most important piece of advice I have is this: NEVER EVER TRUST YOURSELF IF YOU FIND YOURSELF SAYING “I’LL REMEMBER THIS.”
You won’t.
Write it down.
Starting the writing process
At some point–hopefully–in all of this, you’ll find yourself with a story you want to tell. Start telling it. Open up a word document, and write it out (don’t forget to cite things!)
At this point, don’t worry about linear writing — none of the chapters in my dissertation were written straight through from beginning to end. Start writing things down as they come to you, and as they interest you. It doesn’t matter if it’s not very good and you’ll never show your adviser — at this stage in the game, what you’ll want to get over is the oppression of the blank document staring back at you from your computer screen.
In the early stages you’ll have a bunch of paragraphs that don’t link together — that’s fine. You’ll have stories that have a beginning and a middle but no end, or an end with no beginning — that’s fine too.
Potters don’t throw a lump of clay down and create beautiful vases immediately — they do a lot of molding and shaping and sometimes if it sucks they smush the clay back into a lump and start over. Writing is the same way.
What you want in this beginning stage is to get a feel for what you have in your documentation and what stories you’re excited to tell right up front. Let the structure of the document form around it. Don’t worry about whether it’s what you set out to write at the beginning–that can all come later.
Believe me, you’ll get plenty of practice in the months to come!
It probably won’t be as complete as some people would like, and it may go into details others don’t find helpful – the best way to figure these things out is to get advice from different people and see what works best for you.
So, here goes.
Where to Go
Get out the map
You’ve probably identified the archives you want to visit, at least initially, and have a short (or possibly long) laundry list of cities you want to travel to.
One of your first questions is likely to be whether or not you want to do one big trip, or several small trips.
This is, obviously, going to depend on the level of funding you have and other considerations, like whether you’re keeping the lease on an apartment in your home base, or you’re going to be functionally homeless for a few months while traveling–these are all important considerations to bear in mind.
You’ll also probably want to maximize travel efficiency: see what cities are close to each other and cross several archive collections off at once. People from other parts of the country are usually surprised by how short travel distances in the American northeast are, for example. If you’re going to a new country you often have no concept of relative distances, Google maps is pretty good about showing distance in terms of travel times rather than as-the-crow-flies distances.
In general, both in the United States and elsewhere, flying to larger, busier airports is less expensive than flying into small, regional airports that have only a handful of flights in a given day, and/or are only served by one airline. For example: Cheyenne, Wyoming is less than a two hour drive from Denver International Airport, while Wilmington, Delaware is functionally a suburb of Philadelphia. If you’re likely to need to rent a car while you’re in town anyway, save some money on the flight and see a new part of the country.
If you’re going to be traveling internationally, you’ll also need to check things like the passport and visa situation for where you want to travel to (for example: US citizens don’t need a visa to visit the UK or the European countries that share a common border known as the Schengen zone–but, you can only stay in either for up to 180 days in any 365 day period, so if you’re planning to stay longer, you’ll either need to rethink the length of your stay or figure out how to get a visa for a longer stay. Also, if you’re drawing funds from a local research institution or organization, that may change the requirements, so make sure to check well in advance).
Where to stay: I’ve probably contributed to gentrification using Air BnB a few times, but it worked out less expensive than staying in a hotel or using a rental flat service. I also like cooking for myself, and that factored heavily into the equation. You might want to poke around on message boards, listserves, or as the advice of people who’ve been there — each location has its own quirks to learn.
There are other fiddly bits to take care of. For example, I encouraged you in the last post to plan out the workflow you’ll use to get documents into a form you can use later when you’re writing. Depending on where you’re going, you might run into issues with electrical outlets being shaped differently, or having different voltage. The US, Japan, Saudi Arabia, and much of Latin America use 110 volts AC, while most of the rest of the world’s electric current is 220-240 volts AC. Most computers, cameras, and electronics can handle either these days, but do check before you accidentally blow something up.
{Rant: Also, I don’t care what the travel guides say, Switzerland does have different plugs than the rest of continental Europe, and the ones that work elsewhere don’t fit Swiss outlets. Fortunately the Swiss are used to this and sell adapters pretty much everywhere.}
In short: do your research so that when you get to where you’re going, you can focus on doing your research.
Archive Access
Spend some time looking up the various archives you want to visit and make note of what you’ll need to gain access to them. This can vary wildly, and it’s not always easy to gather everything at the last minute, or from a remote location.
It’s pretty common that you’ll need to produce photo ID when first registering at a new archival location. Within the US, for example, my driver’s license is usually enough. Internationally, however, the most useful and widely accepted ID is going to be your passport, not your home country driving license–although the latter is particularly useful (in addition to your passport) if you need to produce some sort of official documentation with your home address. Your university ID may also be needed to verify your institutional affiliation.
In addition to the type of ID you’ll need, pay attention to the number of forms of identification you’ll need to produce. I went to one archive that required three for some reason, which required me to go into the back of the closet and dig out that box where I keep important things that I only need to access once a decade or so.
Less common things I have been asked for include a letter of introduction. This is, essentially, a letter of verification from your home department at your university that says that you are who you say you are, that you are affiliated with them, and that you are legitimately conducting academic research toward completion of your doctoral or master’s degree. It is usually fairly critical that it be on letterhead and signed by someone who isn’t you.
It’s probably not a bad idea to write one up, have your advisor (either your dissertation advisor, or the department graduate advisor) sign it, and make a few copies before you set out on your research trip just in case (also, scan it so that you have an electronic copy that you can send by e-mail).
Pay close attention to when new users can register and where to go–registration hours for new researchers may be different than normal archival access hours; in my experience you’ll probably want to get there when they open.
Let Your Fingers Do the Walking
If you’re a young’un, you probably don’t recognize this subheading as AT&T’s slogan for the yellow pages, which used to be this actual physical book of phone numbers everyone had in their house before Google happened. The idea was that, instead of driving around from place to place to see if they had what you needed, you could save time by phoning from the rotary phone in your kitchen (which had a cord) to ask in advance before you left the house.
The idea is the same, even if we’re now in the era of the Internet.
Some archives allow you to register online in advance, which will save quite a bit of time when you arrive because your information will be already filled out and in the computer system. (This doesn’t always work; I did have a glitch once that had three tech people at the British Archives scratching their heads, although it did make me feel better to know it wasn’t just me.)
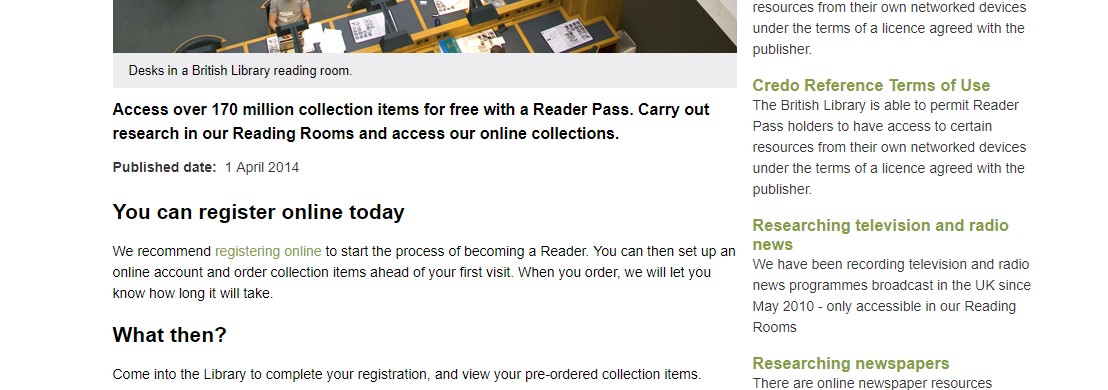
Some collections allow you to request items in advance online to have them waiting when you get there the next morning; this may not be an option for new researchers who haven’t yet arrived in person, but it’s worth checking. The British Library, for example, not only lets new users request items before they get their reader’s ticket (in American: library card)–but doing so lets you skip the part of the registration process where you describe your research interests.
Pay very close attention to the need to reserve a time slot at an archive. In my experience, archives that require reservations in advance are very strict about not allowing walk-ins.
Ideally you’ll want to have things sorted early, especially if international travel is involved, but I have contacted some archives with just a couple of days’ notice (“By any chance, might you have an opening…?”) when, for example, I found a file folder in one collection in London described the activities of an organization that seemed relevant to my research–and a quick online search revealed that the organization had its own archival holdings in another collection close by. (This is why having extra sets of documentation helps – you may think you’ve got a set list of everywhere you want to do research, but sometimes discoveries happen!)
Another reason to be in touch early (even if it’s optional), especially if an archive doesn’t have its holdings fully cataloged online, is to describe your project and determine whether there is useful material in the collection. Archivists often know their collections fairly well and this can help you decide how to allot the time you have.
I had one archive tell me point blank that they had nothing useful for me — disappointing, but far less disappointing that it would have been had I spend time and money going out there to get the same answer. Another archive, it turned out, had the files I was asking about digitized and just sent them to me electronically (the World Health Organization in Geneva).
The UN archives in Geneva, especially for the League of Nations period, doesn’t have the most useful online catalog; the archivists there are superb and pointed me in all sorts of directions I never would have considered otherwise.
In short, it never hurts to let someone know you’re coming. The worst thing they’ll say is “we don’t have anything that matches that”–which, while disappointing, is still useful information. If they do, they’ll almost certainly help you gain access if they can.
How Long?
Now. You may have noticed that the one thing I haven’t discussed is this: how long you’ll need to spend in a particular place or at a given archive. And, in short, this is because I can’t answer this question for you.
I would suggest that if you can, you take a few days and visit a collection to do exploratory research–my home department gave small sums of money for this, and I spent a week in London digging around.
The consideration of time is not just about how long it’ll take you to work with a file; it’s also about how long it takes files to be brought out to you, how long you’re able to work with them, whether the reading room closes for lunch, high tea, or something else, etc.
If you can bring a laptop or camera into the archive room, the process will go faster. If you have to transcribe everything on a pencil and pad, it’ll go slower. (Also pay attention to whether a ban on cameras extends to cell phones–some archives don’t like cameras because of the noise, but are okay with phones).
You’re probably going to want to get a sense of all of this before you book A Big Trip. (And, at the risk of repeating myself, it’s also a reason why you want to have your workflow established before you head out — you won’t want to be spending time in the archive itself trying to figure out how to take photos in low light, or realize that you need a cable you didn’t bring).
In general, having more time than you’ll think you’ll need is better than the opposite. It gives you more time with the material, and more time to follow leads to new collections you might not have considered visiting beforehand.
I have several posts envisioned detailed how to plan your research year, and I’ve decided to start with a couple of posts about what to do before you even leave home or set foot in your first archive.
(Full disclosure: This series will primarily discuss doing archival research; although what I say will be somewhat useful if you do oral history or other kinds of fieldwork, I won’t be targeting those specifically because I have pretty much no experience with them myself).
I’m writing these in no particular order and, in fact, I’m starting with workflow because a couple of friends are already working through this and I thought it would be most useful to them if I started here.
So.
What is a workflow, and why do you need to plan one?
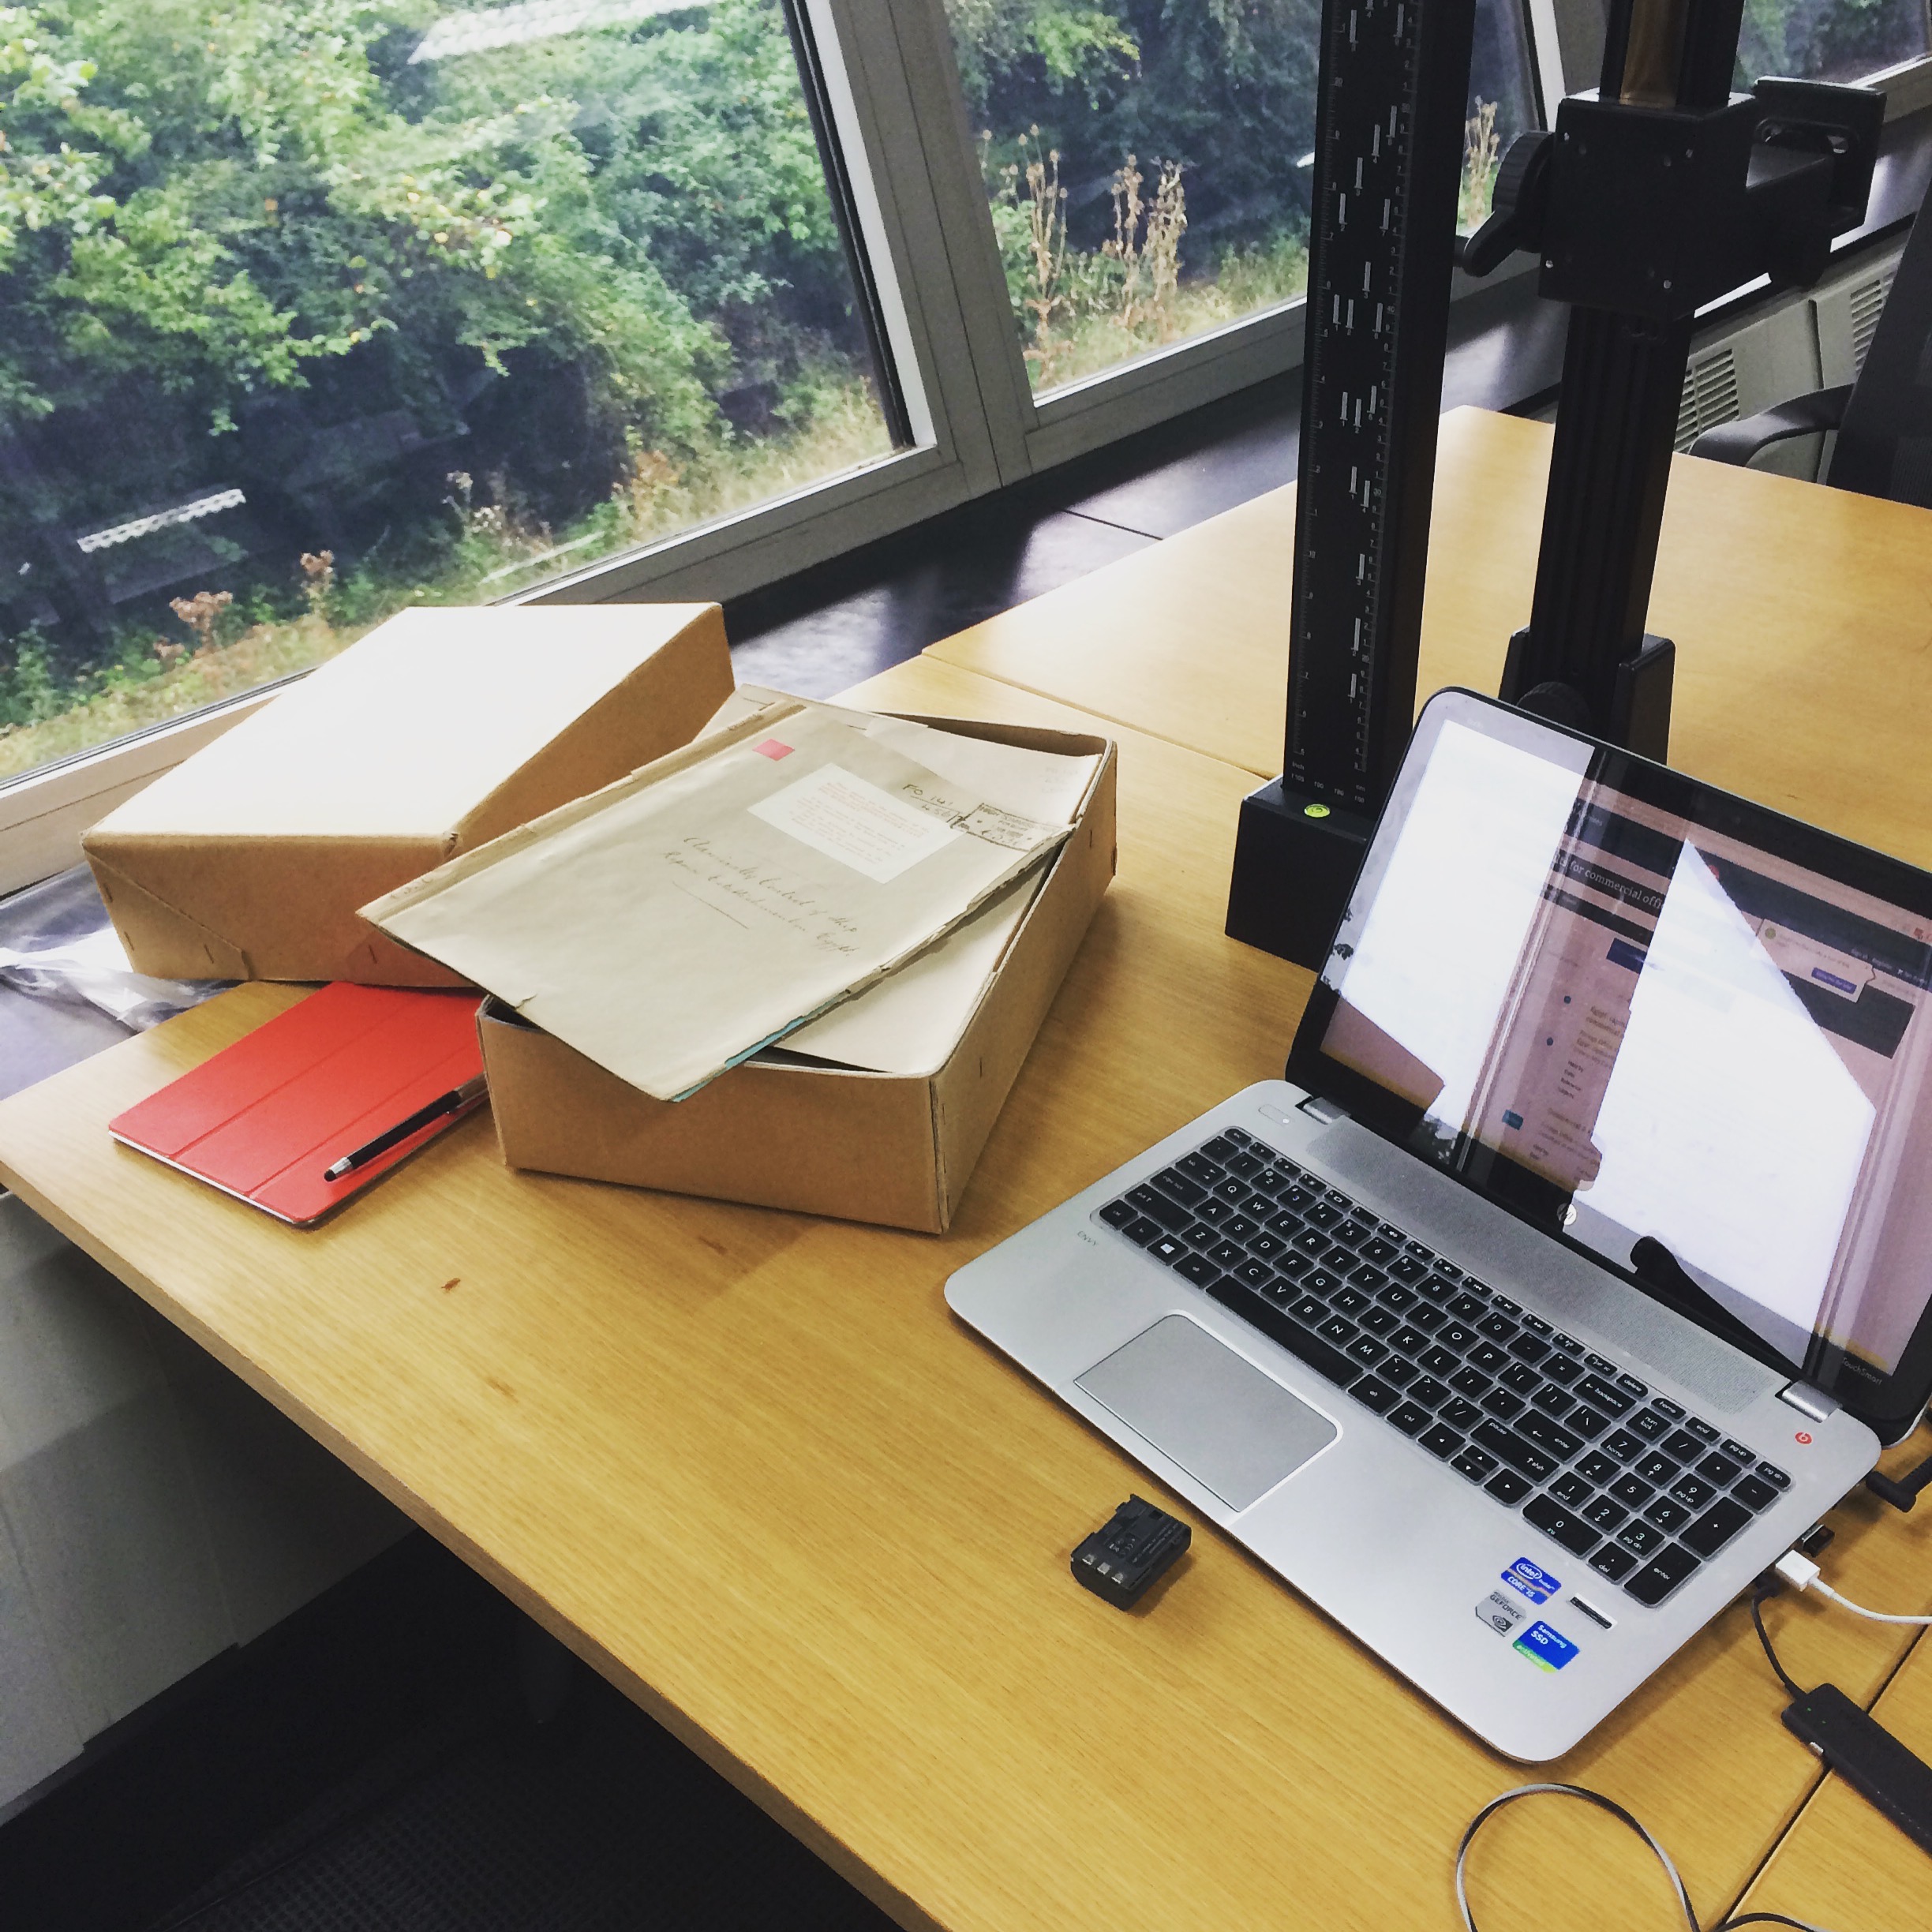
Simply put, a workflow is how you go from this:
to this:
It’s a bit difficult to see, but the PDF of the document in the top photo with the blue cover is digitally attached to the entry highlighted in the screenshot on the bottom.
(For the record, the top photo was taken at the British National Archives in Kew).
Now, you may be asking yourself: yes, but why do I have to figure this out in advance?
The most important reason to have a workflow figured out is this: you need to determine how you’re going to get those thousands of pages you find in an archive into a usable format and bring them home with you.
1. Photocopying is expensive. Even if it’s just 7 cents a page, if you wind up photocopying a thousand pages (which is *incredibly easy to do*), you’re going to spend some serious bank. Photocopies are also heavy and take up space in your luggage. And then, of course, there’s the question of what happens if they get wet, dropped, spilled, stolen (along with the rest of your luggage), torn, burnt, etc.
2. Photocopying takes time. A number of archives do not have self-service photocopy machines; they have copying services which will do it for you. This comes at both a monetary cost and a time cost, because unless the copyist is literally sitting around with nothing to do, you may not get the copies back the same day.
3. Okay, I’ll scan them. Sure thing! Except that scanning and photocopying are usually two halves of the same coin, performed by the same person at the same copy service that charges per page and probably won’t get to it as fast as you’d like or need.
I’ve been in a couple of dozen archival collections and I’ve seen exactly one with a self-scanner. It was located outside of the special collections room where the material I wanted to scan was kept, and I wasn’t allowed to take the material outside of the room.
4. Scanning has its own challenges. Also … even self-service scanning may not be free. There is a flatbed scanner at the Wellcome Collection in London, which is a research collection that I adore for its cheerful atmosphere, friendly and helpful staff, decently priced cafe with surprisingly good food, and bookstore that I can never get out of without dropping at least £20. In fact, I recommend that anyone passing through London whose research pertains in any way to science or medicine take a look (their catalog is online so you can see in advance what they have).
It is, in fact, the same flatbed scanner that my home university library has, with the same little port to plug in a USB device, and I was delighted to find this out became it meant I wouldn’t have to mess around and figure out how the machine works. I laid out my book, hit “scan” … and nothing happened.
That’s when I saw the little sign saying that there was a cost of £0.10 per scan.
In one of my few moments of actual frustration at Wellcome, I discovered that the cost of the scan has to be paid with a copy card, which can only be purchased in cash. American readers may not see the issue here, so let me clarify that the UK is well on its way to being an entirely cashless society. I had literally not been presented with a cash-only situation during my entire stay in the UK, save for the weekly food market behind Birkbeck College, which had huge signs at the entrance warning people and pointing them to the nearest cashpoint.
I had no cash on me, and as far as I was able to tell there wasn’t an ATM anywhere within the same block as the library. So … yeah.
So, how do I plan a workflow?
What it comes down to is this: you need to have a plan as to how you are going to capture the documents you want, store them securely, and annotate them (this is so, so important), and you need to be comfortable with both the hardware and software that you’ll be using before you leave the house for the first time.
Learning this all in the field wastes your time and money. Most of us are on some sort of research funds (I actually wasn’t–more about that in a future post), meaning that we need to produce while we’re there. Losing a day’s work because you took all of your photos at the wrong ISO and they came out so pixelated as to be unreadable is a risk you don’t want to run (even more if you don’t understand what I just said).
Plan your workflow by working backwards.
Start by asking yourself this question: when you are sitting at your computer writing your dissertation, how do you want to consult your documents? Are you envisioning them as multi-page PDFs with searchable text? As paper copies in front of you (as much as I just pooh-poohed the idea of photocopying, if that’s your thing and you have the funds to support it, go for it)? As something else?
I’ll stop asking you these questions and tell you my personal answer, but I want to emphasize again and again, as I have throughout this entire guide to grad school, that the most important thing is that you devise a system that feels natural to you and that you’re comfortable with. You don’t have to do it the way I did.
I wanted to have PDFs of the documents. I have to admit that I didn’t really think much more through it than that, which became something of an issue when I got to the British Archives and discovered that a file number could refer to a single piece of paper in a folio, or to two massive boxes bound together with twine. This is where creating bookmarks within PDFs became important.
The question for me then became how to capture the documents as digital images and get them into PDF form.
Camera, laptop, documents, iPad … check! Turns out this was a bad idea.
I originally did this using my digital camera–the British National Archives has camera mounts for stability–to capture images, which I then transferred to my laptop using Adobe Lightroom where I … you know what, I don’t even remember. I did this on a short research trip and the workflow of getting the images off my camera into Lightroom and thence into a PDF was so utterly cumbersome and time consuming that it literally took me three years to get everything processed.
See, I like to take photos and I know how to use Lightroom … for photos. As it turns out, I did not know the first thing about using Lightroom to create documents from photos.
This is why I insist that you try your workflow at home. Pull that copy of Harry Potter and the Goblet of Fire off the shelf and act like it’s a book you need to copy.
I wound up regrouping using a capture device I hadn’t taken seriously: my phone.
A friend pointed me in the direction of a scanner app — Scanner Pro (no, I don’t have this monetized) — that works on the iPhone. There are similar apps for Android and other platforms, and Office365 and I believe Google Docs are jumping into the fray with their own entries.
Scanner Pro isn’t free, but I realized it would pay for itself after about three archival boxes so what the heck.
What I like about it is this: it does a terrific job of capturing print documents, of deskewing them (meaning: if you take a photo of the document at an angle, or the document is crooked in some way, as it might be if it’s bound together, as the British documents are, you can draw a box and it kind of straightens it out; enough for government work anyway), of creating multi-page PDFs, of running OCR (optical character recognition, meaning that it looks for recognizable text within the image–this is what makes the document searchable), and–extremely importantly from my point of view–it uploads the documents to the cloud (Dropbox, Google Docs, and Box are all covered at least).
Hence, by the time I left the archive I would have already uploaded that day’s work into the cloud. Even if my phone got lifted on the tube ride home, I wouldn’t have lost my work.
Now, as I said–I have no vested financial interest in Scanner Pro and could not care less if that’s the app you choose to work with. The important thing is that you pick an app and work with it a bit so that you know how to use it pretty well before you set foot in an archive.
I would suggest that you try out a number of different types of documents in different formats–Goblet of Fire is a big, fat book, so you can see how your program deals with curvy pages. Also try single documents, big type, small type, and if your work is likely to involve images, try those too.
I do not find that Scanner Pro works great with images, but I didn’t have many to contend with and was just as likely to use the actual camera function on my phone for those.
Dealing with the files
Okay, so you now have a system to digitize images into files. Great!
Hey, where are you going? Our work here isn’t done.
In fact, what comes next is VITALLY important.
It’s also incredibly tedious and easy to let slip. Try not to let it.
So, now you have a bunch of digital files … now what?
If you’re like me, your hard drive starts to look like this after a while.
In case you were wondering, there are six hundred files in this folder.
Also in case you were wondering … those are not the original file names that I gave these. I retro-organized this folder almost a year after I collected these articles because I realized that I had no idea what any of them contained. (The format is YYYY-MM-DD because Windows keeps it in order by date that way).
So, first up: two other tools I used.
One is a PDF editor. Scanner Pro does a lot, but sometimes I need a little more boost. Or I needed to OCR a language other than English. Or I wanted to insert bookmarks, as I did with this copy (left) of the testimony to the Milner Commission in 1919, because the file I generated was over two hundred pages long.
Sometimes I leave little digital sticky notes in the documents. As long as it took me to learn how to work paperless, I did eventually master the skill because … did I mention there were six hundred files in that one folder alone?
For this task, I lit on PDF XChange Editor. I’m not linking to it here because they’ve changed the way they sell the software–when I first found it, the PDF Viewer and the PDF Editor were sold together for about half the cost of what they’re selling each individually for now.
If you’re with a university and have access to student pricing, compare with Adobe Acrobat or see if your university offers another solution.
When it came to putting it all together, I am a huge fan and devotee of Zotero, which I will link to because it’s free and fucking fantastic.
Zotero is your digital librarian. There’s a lot of training available online (free), and a lot of universities support it pretty well–it can take a bit to unlock all of the things it can do, but here is why I like it a lot.
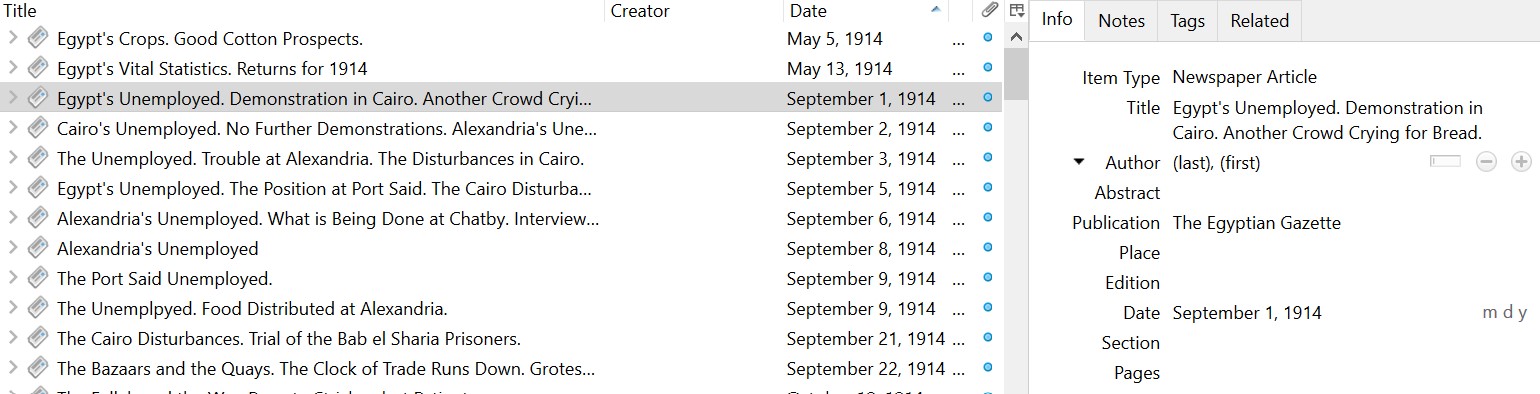
Here, for example, is what the Zotero version of the folder I posted above looks like:
I did have to go in and enter the title of each article, the author (if it had one), and date — this is something I would highly recommend that you get into the habit of doing daily. When I would come back to the flat I rented in London for my research stay, I would pour a glass of wine and sit in front of the TV and pick away at this on my laptop. If you let it go, it becomes unwieldy.
But here’s why this is useful. First off, you can include tags on each entry:
Now, if I want to find all of the articles from the Egyptian Gazette that have to do with unemployment demonstrations, I can find them.
Second … if you double click on the entry, it opens the PDF. (I use Box storage as my Zotero storage). It’s all linked right there.
Third, Zotero has plugins for Microsoft Office and OpenOffice (and other things–as it’s open source, people are constantly developing plugins) so that you can generate footnotes and endnotes without having to retype everything.
You can also import records into Zotero directly from your university library’s catalog — again, you don’t have to retype everything.
Seriously, given the number of people I know who had to spend days “fixing” their footnotes prior to submitting the dissertation, I cannot recommend Zotero enough.
But again, it has a learning curve.
Practice, Practice, Practice
This is my last piece of advice here, and it’s one I’ve said over and over: make sure you know how to use your tools. Make sure you’re comfortable with them. If something is a bit squidgy (academic term), google and see if there’s a workaround or how others have dealt with it.
You’ll have enough unanticipated issues to deal with on the road as it is. Having a solid plan as to how you’re going to work with the material you can collect from the beginning will take a lot of the stress off of your shoulders, so that when you get to the archives you can be productive right away.
In future columns on the research year, I’ll discuss how to plan out what you’ll be doing, and how to try to keep sane while you’re on the road. Stay tuned!